Sunday, June 15, 2014

31DC2013, Day 30: Inspired by a Tutorial. Camo Nails!

It was hard to go back to the  31 Day challenge from last year, but with only two manis left,  I just have to finish it!!!
The last "Inspired By" topic is "Inspired by a tutorial". There are so many techniques I haven't tried yet - lead light + stamping, pond manicure, free handed roses, etc., etc. I also though military/camo manicures look kind of cool... So here are my first camo nails:


I planned to add some dark, almost black green as well, but after I did my thumb I chickened out and left the rest as it was:


A friend of mine said she liked my thumbs better. And I still cannot decide ;) Maybe my thumb just had too many small spots... Next time I'd go for bigger shapes as on my middle and ring fingers.
Which alternative do you like more?


Pointer and pinkie: dark teal Leighton Denny Femme Fatale (got in a set in TK Maxx)
Camo Pattern: light green OPI Stranger Tides, medium green Formula X Fearless (my NY super haul), Leighton Denny Femme Fatale
Studs: 3mm square studs from ebay

There are a lot of tutorials on how to create military nails, but I these these two the best for me:


Read More......

Tuesday, June 10, 2014

Retro stripes with KB Shimmer Sky Jinks

Last weekend a friend of mine had a retro themed birthday party. So naturally, retro nails matching my outfit were a must :)


The blue polish is a fantastic creme from KB Shimmer Spring 2014 collection called Sky Jinks. The formula is a dream and the opacity is amazing - I'm wearing one coat! The color is probably the matter of taste, but I think it is awesome - bright blue like the summer sky, with a hint of dustiness. Not a neon, just a beautiful blue.

Base color:  KB Shimmer Sky Jinks, bought from Harlow & Co (they ship internationally).
Stripes: free handed with a striper brush and Essence Flashy Pumkin   Read More......

Tuesday, June 3, 2014

How To: easy clean up

Everyone knows what a mess a gradient or water marbling can be. My cuticles are very dry, so I try to avoid using too much nail polish remover on my skin. This post is about some great ideas of how to minimize your clean up.

Easy gradients with masking fluid

Couple of moths ago I saw this genius trick: use masking fluid to protect your cuticles!
Masking fluid is a kind of liquid latex, used in watercolor painting to preserve areas of the painting you want to remain white. Once the fluid is dry, it has a waxy, rubbery surface and paint won't stick to it. Check out this youtube video to see how it works in watercolor.

Some fellow nail addicts use white PVC glue to protect the skin around the nails. Masking fluid has a similar effect, but it is water resistant - which is perfect, if you want to rinse your hands while your gradient is drying and you're not completely done yet.
Normally, I'd apply a thin coat of the masking fluid around my nails and let it dry. After I did my gradient, I'd just rub the layer off.
Masking fluid is also called frisket or liquid mask (Rubbelkrepp or Maskierflüssigkeit in German and маскировочная жидкость in Russian).


Tape: remove excess stamping 

Wacky Lacki posted this great tip for stamping cleanup. It works like a charm! If you're fast you can even remove stamping from your nail, if it didn't turn out well.
Check out the full tutorial by clicking on the pic:


Tape for water marbling

Taping your nails is very easy, but you cannot tape both hands at the same time - a no go for gradients. But it works perfectly for water marbling. My Simple Little Pleasures has a great tutorial on how to do it:


Do you have any tricks? Please share! :)


Read More......

Wednesday, May 28, 2014

31DC2013, Day 29: Inspired by the supernatural

I was determined to finish the 31 Day challenge from last year, but I see all these awesome manis on the net - and I quickly forget my actual goal ;).

C'mon, there are only three manis left and then I'm done with my first ever nail art challenge :) Here comes my supernatural mani:

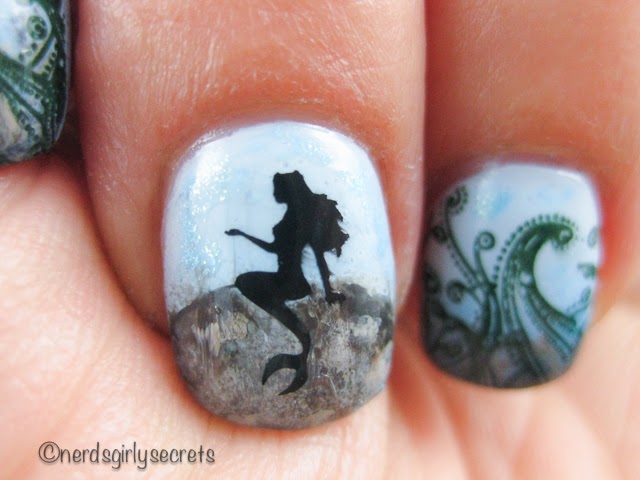
Apparently a just cannot stop buying MoYou stamping plates, so it's high time I start using them!!! The base for this mani is a light blue gradient. Then I randomly sponged grey, beige and mud colored nail polishes to create the rocky bottom and stamped the cute mermaid and water plant patterns on top of it.
My top coat smeared a bit, but thank god I noticed it before ruining the design completely.

Base color: pale blue gradient with Formula X Infatuated and China Glaze Bahamian Escape, added spots of Picture Polish Whimsy around the stamped patterns
Rocks: sponged different grey polishes on top of each other
Waterp pants: pattern from the MoYou Sailor Collection 04, stamped with dark green Essence Deep Sea, Baby
Mermaid: pattern from MoYou Fairytale Collection 02 stamping plate with Konad black stamping polish
Read More......

Thursday, May 15, 2014

Nailz Craze and Essie "Meet the Parents"

I've bought the Nailz Craze NC03 stamping plate ages ago, but totally forgot about it. What a pity, just look at this cute swirly pattern:


This is the plate I used:

Initially I bought the plate because of the fair isle pattern on the right.  But after I received it, I also fell in love with the unique floral patterns and the cute Russian dolls. It's spring in Hamburg, so I decided to go for the floral design:


Essie's Meet the Parents, which was the base for my middle and ring fingers, is from the new Essie Wedding 2014 collection. The formula is quite sheer, a little streaky at first and needs three coats. But it's not that bad and the color is quite unique and absolutely beautiful - a muted, dusty light blue. I have a light to medium skin tone and still this cooler toned color looks good on me, right? I also saw this polish on a very dark skin and it looked awesome as well.

Base color: Essie Meet the Parents (bought on my trip to NY) and Essie Blue Rhapsody (index finger)
Stamping: Nailz Craze plate NL03, bought on Etsy, stamped with Essie Blue Rhapsody
Glitter: my pinkie is covered with Maxybelt Arena Plata - a sand glitter polish (bought for $2 during my trip to South America... What a deal, right?)
Read More......

Sunday, May 11, 2014

New York mani

My hubby and I have just returned from our trip to New York. What an incredible city!  We dreamed about going to NY for so long, I was giddy with anticipation before we left. And naturally I had to do a NY mani!

The skyline comes from the fantastic Bundle Monster plate BM-414. I was so excited, I couldn't stamp straight ;) The resulting image is more like New York fata morgana to be frank ;).
Mani done, I felt prepared to go:


Despite my "wavy" stamping I loved my nails. And it was a huge success in NY ("Oh, I love your nails!" and "Oh, this is New York! So cool!"). Who new that nails could be such a conversation starter! :D

Gradient: Mint Polish Tart, China Glaze Sugar High, CG Fade Into Hue, Essie Midnight Cami over one layer of no-name white
Stamping: BM-414 with A-England Camelot
Read More......

Thursday, May 1, 2014

Yeeey! Fing'rs decals from ChitChatNails!!!

It's hard to believe, but I won the Fing'rs Nail Tatoos Giveaway from Marta's blog ChitChatNails!!! Yeeey!!! I got the decals last week and had to use them for my mani:


Look at this, this or this post from ChitChatNails. Now you know where my inspiration comes from ;) Marta is the queen of skittlettes - this cool mix'n'match styles, where at least two nails are different from the others. My skittlette obsession started with her blog. If you're not a fan yet - check out her skittlette-tutorial and start following!


Base color:  P2 Sweet Like Sugar and OPI My Vampire Is Buff.
Glitter: Ligne D'Or Azúcar Canela - the best textured glitter I have. Bought for $1,50 during my holiday in South America.
Water decals: Fingr's Nail Tatoos

The rose colored P2 polish is a new addition to my collection - bought it in my local drugstore yesterday. The color is beautiful - slightly dusty rose with some soft shimmer. The formula however is a nightmare for me - thick, streaky, dries quick on the surface and doesn't level itself out much. I had to use tree careful coats to hide bold spots. If you do thin coats and usually manage to paint a nail without going twice over the same spot, you'd be fine with two coats.


Read More......