Showing posts with label Essie. Show all posts

Tuesday, September 15, 2015

[#WNAC2015] September Jewel Tones: Dry Marble

These were my jewel toned nails for the last week's topic of #wnac2015. Although I could always do another emerald green, I decided to go for amethyst:

Dry marbling is not my favorite technique - I'm just not the type for these colorful swirls/flowers. So believe me, to do the nails for this topic was a challenge. But in the end I quite like the result. I can imagine doing another mani, I just have to stay in the same color scheme. 

I just had to show you the Dance Legend holo polish in the sun!


Base Color: Essie Lapis Of Luxurythe holo-dream on my ring finger is Dance Legend Fallen Angel (two coats)
Dry Marble: Dance Legend Fallen Angel and Dance Legend Pulsar.

Read More......

Sunday, August 30, 2015

Stripes with Color Club Pastel Neons

Hey everyone,

I'm back after a small break. Enjoying the last summer days I decided to try out my new Color Club pastel neon polishes and a new technique for stripes:


I like the look, but I must admit I almost got mad, doing all these stripes :D I got the idea from an IG tutorial made by @nailyourideas and wanted to try it for ages. The technique looked pretty easy:

  1. Paint some squares with different polishes on a smooth surface and let them dry completely.
  2. Peel off the squares and cut them into stripes. 
  3. Arrange the stripes on your nails, top coat everything and you're done!
I spend first minutes trying to cut straight stripes with my regular kitchen scissors - a nightmare ;) Then almost an hour putting the stripes on my left hand and top coating it three times... I'd never get such straight lines using a brush, but I guess I don't have that much patience... However, I can imagine using this technique for wider stripes or other shapes.

As for my new polishes, as expected, I really loved the colors. Most colors on my nails are from Color Club Pastel Neon collection. I would have liked a wider brush, but the colors are so cute, I don't care ;) I got the polishes from the Spanish shop Elyt. My first package got lost on the way to Germany, so it wasn't as smooth transaction as I expected, but Carmen - the owner of the shop - was super friendly and arranged a replacement. Thank you!

Base color: white by Mesauda
Stripes: darker violett Essie Sittin' Pretty, thin neon green stripes Nabi Pastel Neon 177, others are Color Club Meet Me At The Rink(blue), Disco's Not Dead(yellow), Feathered Hair Out To There (bubble gum pink), 'Til The Record Stops (pale green), Hot Hot Hot Pants (peachy neon)
Read More......

Thursday, May 15, 2014

Nailz Craze and Essie "Meet the Parents"

I've bought the Nailz Craze NC03 stamping plate ages ago, but totally forgot about it. What a pity, just look at this cute swirly pattern:


This is the plate I used:

Initially I bought the plate because of the fair isle pattern on the right.  But after I received it, I also fell in love with the unique floral patterns and the cute Russian dolls. It's spring in Hamburg, so I decided to go for the floral design:


Essie's Meet the Parents, which was the base for my middle and ring fingers, is from the new Essie Wedding 2014 collection. The formula is quite sheer, a little streaky at first and needs three coats. But it's not that bad and the color is quite unique and absolutely beautiful - a muted, dusty light blue. I have a light to medium skin tone and still this cooler toned color looks good on me, right? I also saw this polish on a very dark skin and it looked awesome as well.

Base color: Essie Meet the Parents (bought on my trip to NY) and Essie Blue Rhapsody (index finger)
Stamping: Nailz Craze plate NL03, bought on Etsy, stamped with Essie Blue Rhapsody
Glitter: my pinkie is covered with Maxybelt Arena Plata - a sand glitter polish (bought for $2 during my trip to South America... What a deal, right?)
Read More......

Sunday, May 11, 2014

New York mani

My hubby and I have just returned from our trip to New York. What an incredible city!  We dreamed about going to NY for so long, I was giddy with anticipation before we left. And naturally I had to do a NY mani!

The skyline comes from the fantastic Bundle Monster plate BM-414. I was so excited, I couldn't stamp straight ;) The resulting image is more like New York fata morgana to be frank ;).
Mani done, I felt prepared to go:


Despite my "wavy" stamping I loved my nails. And it was a huge success in NY ("Oh, I love your nails!" and "Oh, this is New York! So cool!"). Who new that nails could be such a conversation starter! :D

Gradient: Mint Polish Tart, China Glaze Sugar High, CG Fade Into Hue, Essie Midnight Cami over one layer of no-name white
Stamping: BM-414 with A-England Camelot
Read More......

Thursday, December 26, 2013

Merry Christmas everyone!

I hope you're having a wonderful time with your family or friends!
I'm having my own way to express my joy over this cozy and cheerful holiday - I've been waiting for months to do this Three Kings Christmas mani :)


The awesome shapes of camel riders are stamped using Messy Mansion's Christimas plate MM01.


I saw this design in summer and had to order the plate IMMEDIATELY. Then I've waited patiently month after month for the right day to recreate it. Finally!!! :) I'm being a total copycat here, but c'mon, isn't it just awesome!?!


I used dark blue and two gold glitter polishes to create the glittery background. I didn't have my camera with me so it was really difficult to capture the amazing sparkle of the China Glaze's I'm Not A Lion.
I love this mani - it is so festive and glittered perfectly in the candle light :)


Base color: my trusty blue Midnight Cami by Essie
Glitter: China Glaze I'm Not A Lion and some big gold glitter by Essence called Gold Fever
Top Coat: Northern Lights over the top ("sky")-part of the nail and a coat of Seche Vite

Enjoy the second Christmas day and prepare yourself for the New Year Paa-haarty!!! :)

Read More......

Saturday, December 14, 2013

31DC2013, Day 19: Galaxies

Galaxies is the next topic of the 31 Day Challenge. I've never done such a mani before, but there are so many tutorials on youtube, that you can spend days watching them :) One of my favorites is this one, done by a fantastic Pauline from Blogenbeaute blog.
There are also thousands of galaxy nails pics on Google. While looking at some really fantastic examples of nail art, I decided that I liked a mani more if there was not so much "stuff" on the nails. Where you could see the starry skies and don't get drown in all the nebulas :) I also decided that I don't like these white dots, which represent the stars. Equipped with this theoretical knowledge, I set to work.

So please welcome my first galaxy mani!


I'm so totally in love with this design, I'll probably wear it until it starts chipping. Doing these astral clouds was so much fun! I totally get it now why so many manis look overloaded with nebulas - I had to force myself to stop "nebulating" on my middle finger :D


Base color: navy blue Essie's Midningt Cami and just a little of the black A-England's Camelot to create some depth in the skies
Nebulas: no-name white, China Glaze Towel Boy Toy (bright blue), Essence Break Through (purple), China Glaze Pool Party (neon pink)
Stars: Northern Lights Top Coat I got from US on Ebay


Do you like the color combination?  I would try a slightly darker blue color next time and maybe create clouds with lighter, more transparent edges. Wouldn't it look better..?

Read More......

Wednesday, December 11, 2013

31DC2013, Day 17: Glitter with "I Heart You" by Glimmer by Erica

I did some serious thinking about how to create a glitter mani I could wear to work. So the 31 Day Challenge is not just about the nail art, but how to make it wearable as well :)
I decided to use the beautiful indie glitter polish by Glimmer by Erica I got on Etsy and wore the baby blue and then pink silk blouses to work. It was fun to be a bit more girly for a change :)
(Sorry for the dark pic, I'll get better, I promise!)


Base Color: China Glaze Go-Go Pink and Essie Bikini So Teeny
Glitter: pink and blue glitter top coat called "I Heart You" by Glimmer by Erica Read More......

Wednesday, October 23, 2013

31DC2013, Day 13: Animal Print

October is almost at its end and I haven't even reached the middle of the 31 Day Challenge. At this pace I'll be probably creating manis for this challenge in January :D

I have a fantastic spring-green silk scarf with zebras on it. It's such a fun accessory, I really love it. So the idea for the animal print nails was there even before I really started to think about it. I'm not totally into the resulting style, but it was a good mani training:

The colors, the pattern -  it was too much for me, so I added the matte finish to make the look more calm:


Base color: Essie's Shake Your $$ Makers
Gradient: black China Glaze Liquid Leather
Stamping: Zebra print from Konad plate m57 stamped with A-England Camelot
Matte Top Coat: Cult Nails Wax That

Read More......

Sunday, October 13, 2013

31DC2013: Day 11, Polka Dots

I'm still determined to go through the September's nail art challenge. Unfortunately I can just do 2 or 3 manis a week - so I'm proceeding at snail's paste ;)
I only remembered the "dots" as the next topic, so I've made a dotticure, but not one with polka dots... So what, I decided - dots are dots! ;)


Base color: 2 coats of Essie's Midnight Cami
Dots: A-England Holy Grail
Glitter: Northern Lights Top Coat

The Northern Light top coat has some beautiful holographic glitters. But it is not so dense to overpower the design you've made. It just adds some sparkle to your mani. Love it!
Read More......

Friday, October 4, 2013

31DC2013: Day 09, Rainbow Nails

The 31 Day Challenge was for September, so I'm officially late now. But it is so much fun and I'm learning a lot. So I'm still following it through. But man, have I struggled with the next topic...
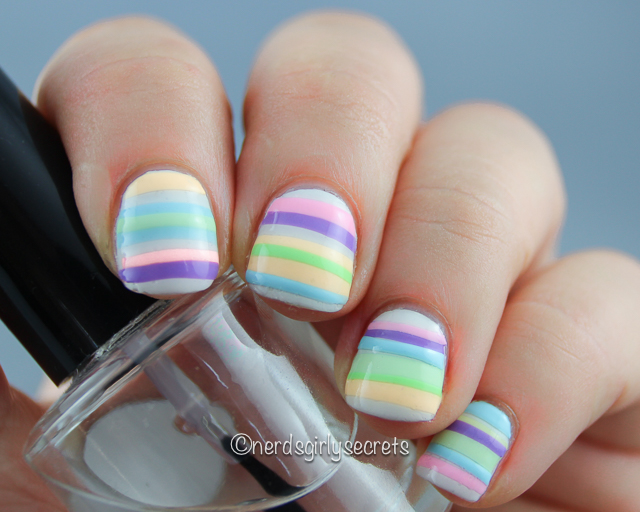
I rather like simplicity and clear lines, so rainbow colors all at once are just a bit too much for my taste. But challenge is a challenge, so here I we go:

Cloudy nails  have been present in many blogs last summer, so I wanted to try it out. It's VERY easy to do,  so I'd probably recreate the sky-only-mani next summer.

Base color: white - Cult Nails Tempest
Sky: randomly sponged blue CG Towel Boy Toy and used white polish and a dotting tool to create clouds.
Rainbow: I used most of my China Glaze Neons for the rainbow, thinned with nail polish thinner. I went over the lines several times to create the desired opacity.

 Red - I didn't have a matching shade, so I mixed CG Pool Party(hot pink) and a drop of OPI Big Apple Red
Orange - CG Japanese Koi (my favorite color for pedicure - hot neon orange)
Yellow - CG Sun Worshiper
Green - CG I'm With The Lifeguard
Blue - Towel Boy Toy (light sparkling blue)
Dark Blue - Essie's Midnight Cami
There is CG Fairy Dust as a sparkle over the rainbow.


Well, I probably wouldn't wear another rainbow again, but it was good to learn how nail polish thinner can be used to add the watercolor-y consistence to a nail polish.... ;)

Read More......

Saturday, September 7, 2013

#31DC2013: Day 04, Green Nails

I'm doing the challenge in my own pace and it is so much fun!!! I must confess though, the idea for today's mani was entirely not mine :) I saw this amazing design and had to order the stamping plate MM16 by Messy Mansion immediately! :) I looked forward to the "green" day of the challenge, so I could recreate the design:


Since I didn't have the same shade of green as the sample mani, I decided to try sponging several green shades and even some gold over each other. I absolutely adore this newly discovered marble-like sponging technique!!! It is so easy, so I will definitely do this kind of color blending again!

I thought that black stamps with only one green accent nail looked very dark on my wide nails. The black hid the vibrant green color, so I added just one inverted stamp to my right hand.

Base Color: two coats of grass green Essie Shake Your $$ Makers, than randomly sponged some China Glaze I'm With The Lifeguard(neon green with shimmer), CG Sun-Kissed (neon marker-yellow), P2 Perfectly Good(dark green) and P2 Next Exit: Party! (gold)
Stamping: MM16 plate by Messy Mansion ordered online stamped with black Jolfin stamping polish.
  Read More......

Monday, September 2, 2013

#31DC2013: Day 02, Orange nails

Well it was tough. While thinking of something orange, only carrots , oranges and pumpkins came to my mind. Not really creative ;). Than I thought about all those abstract rounded geometrical patterns in the 60ies or 70ies. Orange and brown, orange and teal... There the idea was born, but with my beginner nail art skills the realization was impossible.
I wanted to use Essie's rich chocolate brown, which is not that pigmented in one coat, so that ruled out any stamping patterns. So I used the dotting tool  (for the first time, btw :) ). Since I was unsure I'll manage to create some circles without accidents, I used acrylic colors. That was unexpectedly easy! So this is the result:

Base color: two coats of pumpkin orange Nyx 114 and rich chocolate color Essie's Lady Godiva
Pattern: acrylic paint in brown and orange applied with dotting tool
Glitters: on thumb, index and pinkie fingers Nfu.Oh #44, which is a flakey golden glitter in orange tinted jelly base Read More......

Monday, August 19, 2013

My first water marble

I've heard that water marbling can be annoying, frustrating and messy. Even some of nail art gurus like for example Nailasaurus say "Never again!". So it was kind of understandable that it took me some time to take my chances with marbling. 
I was going for more subtle look I can wear to work, so I went for the pink/dusty rose color combo and decided to do just two nails on each hand. It wasn't that bad! 

Base color: white (China Glaze Dandy Lyin' Around) on index and ring fingers and Essie Eternal Optimist on others
Marbling and Gradient: Essie Eternal Optimist and China Glaze Emotion
Glitters: Northern Lights Top Coat + Seche Vite

I taped my fingers like shown in the video below (btw, the channel of SimpleLittlePleasures has other nice tutorials) and used tap water. Starting from the second drop my polished didn't spread well, so I moved the cup a little back and forth and it helped a little. It was fun to create patterns and think how it might look on your nail, so I'll definitely marble again!  


Read More......

Friday, July 19, 2013

Galaxy-ish gradient

I was really looking forward to the weekend to do a blue gradient. And I just loooooved it!
As a base I used two thin coats of China Glaze Kinetic Candy, and than sponged stripes of Kinetic Candy, China Glaze Splish Splash and the Essie's Midnight Cami. To give the gradient a little sparkle, I added one layer of China Glaze Fairy Dust. I really love how it came out. I didn't plan to do the spacy galaxy look, I just went with the flow ;) As you can see I still need to practice and not to layer too thick, but I love it anyway!


To see what it would look like, I added some China Glaze Mozaic Madness instead of Fairy Dust on my ring finger. I think the bigger dark blue glitters kind of kill the starry look. So without the Madness ;) this gradient is definitely one of my favorites now!
Read More......

Friday, July 12, 2013


Recently I discovered Nail Art and the meditational value of nail polishing :) My first experiments were fueled by numerous tutorials on youtube and jaw-dropping creations shown by some serious nail bloggers.
Highly motivated I tried some nail art techniques like stamping or gradients and got some astoundingly pretty designs. Some of them I liked so much, I decided I need to document how I managed to do them and which nail polishes I used.
So here I come with my first pics.


To hide the growing out line of my acrylic nails I tried out some simple glitter gradient (Gold fever by Essence) over two layers of Essie's A crewed interest. It was a bit too sparkly for my regular business day, but I thought it was not thaaat flashy, really pretty -  and most important, it absolutely covered the bump of my acrylic nails. A great way to "wait" for the next appointment at the nail studio.


In direct sunlight
Read More......