Thursday, December 26, 2013

Merry Christmas everyone!

I hope you're having a wonderful time with your family or friends!
I'm having my own way to express my joy over this cozy and cheerful holiday - I've been waiting for months to do this Three Kings Christmas mani :)


The awesome shapes of camel riders are stamped using Messy Mansion's Christimas plate MM01.


I saw this design in summer and had to order the plate IMMEDIATELY. Then I've waited patiently month after month for the right day to recreate it. Finally!!! :) I'm being a total copycat here, but c'mon, isn't it just awesome!?!


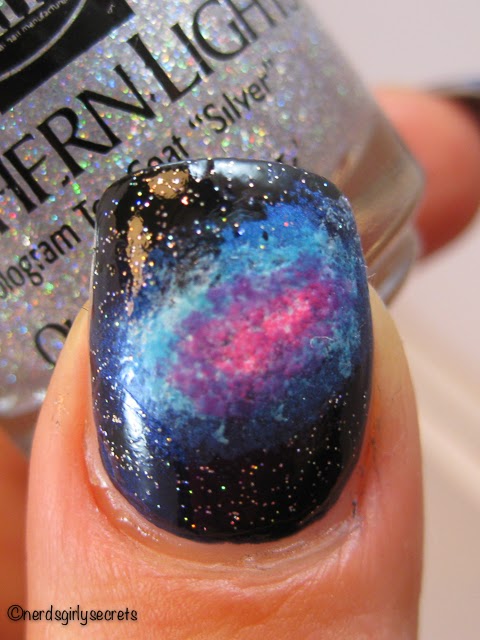
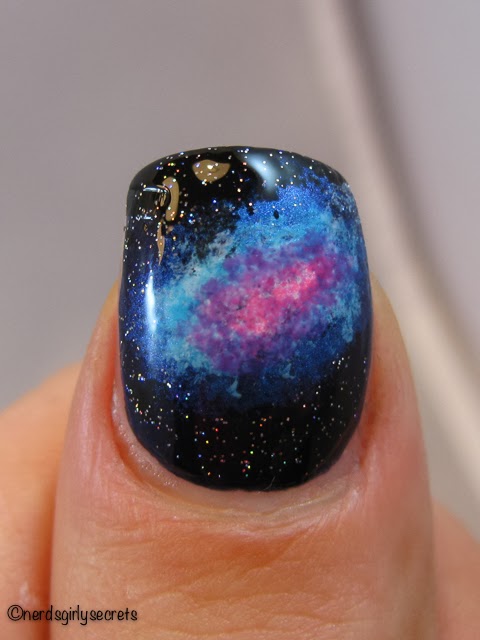
I used dark blue and two gold glitter polishes to create the glittery background. I didn't have my camera with me so it was really difficult to capture the amazing sparkle of the China Glaze's I'm Not A Lion.
I love this mani - it is so festive and glittered perfectly in the candle light :)


Base color: my trusty blue Midnight Cami by Essie
Glitter: China Glaze I'm Not A Lion and some big gold glitter by Essence called Gold Fever
Top Coat: Northern Lights over the top ("sky")-part of the nail and a coat of Seche Vite

Enjoy the second Christmas day and prepare yourself for the New Year Paa-haarty!!! :)

Read More......

Sunday, December 15, 2013

Galaxy Nails Tutorial

My galaxy mani was really popular with my friends and colleagues and I was asked more then once how I did it and if it takes very long to create such a manicure. It's pretty easy I'd say, and it takes maybe some 15-20 minutes max. if you already have your base color dry.


The colorful clouds are created by sponging first some white and than three different colors over the dark blue nails. I prefer to use tweezers and small pieces of  makeup sponge, but you can do it any way it's comfortable for you.
This is what I used:
Makeup sponge & tweezers
Dark blue: Essie's Midningt Cami
Black: A-England's Camelot
White: no-name old white polish
Bright blue: China Glaze Towel Boy Toy
Purple: Essence Break Through
Neon Pink: China Glaze Pool Party

For the stars I used Northern Lights Top Coat I got from US on Ebay. I can imagine China Glaze Fairy Dust would create the same effect, if applied sparingly.
Make sure your base color (dark blue) is dry before you start sponging and then sponge away!

Sponge on some black on the outer corners to create more depth in the skies.
Apply the glitter top coat around the nebula. Cover with top coat. You're done! :)

Read More......

Saturday, December 14, 2013

31DC2013, Day 19: Galaxies

Galaxies is the next topic of the 31 Day Challenge. I've never done such a mani before, but there are so many tutorials on youtube, that you can spend days watching them :) One of my favorites is this one, done by a fantastic Pauline from Blogenbeaute blog.
There are also thousands of galaxy nails pics on Google. While looking at some really fantastic examples of nail art, I decided that I liked a mani more if there was not so much "stuff" on the nails. Where you could see the starry skies and don't get drown in all the nebulas :) I also decided that I don't like these white dots, which represent the stars. Equipped with this theoretical knowledge, I set to work.

So please welcome my first galaxy mani!


I'm so totally in love with this design, I'll probably wear it until it starts chipping. Doing these astral clouds was so much fun! I totally get it now why so many manis look overloaded with nebulas - I had to force myself to stop "nebulating" on my middle finger :D


Base color: navy blue Essie's Midningt Cami and just a little of the black A-England's Camelot to create some depth in the skies
Nebulas: no-name white, China Glaze Towel Boy Toy (bright blue), Essence Break Through (purple), China Glaze Pool Party (neon pink)
Stars: Northern Lights Top Coat I got from US on Ebay


Do you like the color combination?  I would try a slightly darker blue color next time and maybe create clouds with lighter, more transparent edges. Wouldn't it look better..?

Read More......

31DC2013, Day 18: Half Moons a.k.a. Ruffian


I saw this black mani and decided to create rather the crescent moon than the red half moon design for the 31 Day Challenge.
CND for Ruffian Fall 2010
This style is also called Ruffian, since it was created first by CND artists for the Ruffian Fashion Show in 2010. As for me, it looks much more elegant AND modern compared to the classic retro half moon mani. But for a 50-ies dress, I'd probably go for red half moons :).

Dior 2010

It is VERY easy to do and no special tools are needed. Check out for example this tutorial on Youtube. I thought it would be difficult to achieve the clean line without any clean up, but it was much easier than I thought!  I'll definitely do this style again.
Do you see my poor broken pinkie? I didn't just break the nail, I flipped it completely over. It doesn't hurt anymore, but looks terrible. Hopefully, it will heal soon...But nobody died of a lost nail until now, right? ;)


Base Color: two coats of pale gold by p2, 900 Next Exit Party
Second layer: one thick coat of shimmering pink by Yh Beja, Color 10,  bought in South America Read More......

Wednesday, December 11, 2013

31DC2013, Day 17: Glitter with "I Heart You" by Glimmer by Erica

I did some serious thinking about how to create a glitter mani I could wear to work. So the 31 Day Challenge is not just about the nail art, but how to make it wearable as well :)
I decided to use the beautiful indie glitter polish by Glimmer by Erica I got on Etsy and wore the baby blue and then pink silk blouses to work. It was fun to be a bit more girly for a change :)
(Sorry for the dark pic, I'll get better, I promise!)


Base Color: China Glaze Go-Go Pink and Essie Bikini So Teeny
Glitter: pink and blue glitter top coat called "I Heart You" by Glimmer by Erica Read More......

Sunday, December 8, 2013

31DC2013: Day 16, Tribal Print

The next topic of the 31 day challenge  (which every one else has finished in September ;) )  is tribal nails. There are so many really cool designs, but my favorites are all kinds of Aztec patterns.  Since I'm still really bad with free handing, I decided to use acrylic paint for lines and then just fill the spaces with neon pink nail polish.
It was really hard to draw the thin lines until I found a solution and used a toothpick instead of the brush! It's almost cheating ;), but hey, we all have to start somewhere! :)


Base color: white Cult Nails Tempest
Tribal patterns: googled for Aztec patterns and free handed with a toothpick and black acrylic paint
Neon Accents: China Glaze Pool Party Read More......

Wednesday, November 27, 2013

31DC2013, Day 15: Delicate Print

Watch out for mani-snails - I've reached the middle of the September's 31 Day challenge ;). I wanted to do the nude-and-black mani for ages, so idea for this style was born long time ago. Couple of weeks ago I also won a Bundle Monster giveaway from Kelsie's blog (follow Kelsie's Nailfiles for more inspiration, it's worth it!). So finally I was prepared to experiment with black lacy patterns:


It's not perfect, but I love it!!! I like the combo, but I'm not sure if the mani would have looked even better with my index finger un-stamped.  Hmmm, a small golden stud instead of the print... Tough question :)

Base color: fantastic nude by Deborah Lippmann called Naked
Stamping: patterns from Bundle Monster 2012 set (BM-310 and BM-312) stamped with my trusty Camelot (perfect black by A-England).
Studs: golden studs bought on ebay on my thumbs and pinkies Read More......

Monday, November 25, 2013

31DC2013, Day 14: Flowers

I'm back from my holiday. My hubby and I spent three and a half weeks backpacking in Ecuador, but we could have stayed longer - sun, fruits, fish, salsa dancing... The darndest thing about holidays is that they are over so quickly and you have to work again to be able to enjoy such a fleeting, but absolutely marvelous time again ;). So we're back in Hamburg, already working hard for our next holiday... (Damn, why don't I have a rich grandpa somewhere... ;) )

The autumn is almost over and I'm still in the middle of the September challenge. Who cares, I'm going in my own paste! :) The next topic is flowers. I had an idea of free-handed violets done in acrylic paint, but a) I'm still really bad at free-handing and b) I'm not really a flowery type. So I decided to stick to my favorite mix-n-match mani style - skittlette.


Base color: two coats of my favorite lilac Barry M Prickly Pear and just one coat of A-England Elaine on my ring finger
Roses: water decals from Born Pretty Store
Texture: on my poor broken pinkie nail - textured polish from p2 Sand Style - 080 lovely

Read More......

Wednesday, October 23, 2013

31DC2013, Day 13: Animal Print

October is almost at its end and I haven't even reached the middle of the 31 Day Challenge. At this pace I'll be probably creating manis for this challenge in January :D

I have a fantastic spring-green silk scarf with zebras on it. It's such a fun accessory, I really love it. So the idea for the animal print nails was there even before I really started to think about it. I'm not totally into the resulting style, but it was a good mani training:

The colors, the pattern -  it was too much for me, so I added the matte finish to make the look more calm:


Base color: Essie's Shake Your $$ Makers
Gradient: black China Glaze Liquid Leather
Stamping: Zebra print from Konad plate m57 stamped with A-England Camelot
Matte Top Coat: Cult Nails Wax That

Read More......

Wednesday, October 16, 2013

31DC2013: Day 12, Stripes

Admitted, my next mani for the 31 day challenge doesn't have many stripes, but I really like it. The original design comes from this blog post by Young Wild And Polished (thank you!). I loved this elegant look and recreated it with matching China Glaze colors:


Base Color: CG Dress Me Up and CG Foie Gras, stripes done with striping tape.
Studs: my thumbs are pimped with golden 3mm studs bought on ebay.


I tried another design on my thumbs. The color combination and the simplicity of this style is just to my taste. This look was a huge favorite with my friends, so I will definitely re-create this style as a full mani some day to get more compliments ;)
Read More......

Sunday, October 13, 2013

31DC2013: Day 11, Polka Dots

I'm still determined to go through the September's nail art challenge. Unfortunately I can just do 2 or 3 manis a week - so I'm proceeding at snail's paste ;)
I only remembered the "dots" as the next topic, so I've made a dotticure, but not one with polka dots... So what, I decided - dots are dots! ;)


Base color: 2 coats of Essie's Midnight Cami
Dots: A-England Holy Grail
Glitter: Northern Lights Top Coat

The Northern Light top coat has some beautiful holographic glitters. But it is not so dense to overpower the design you've made. It just adds some sparkle to your mani. Love it!
Read More......

Saturday, October 12, 2013

31DC2013: Day 10, Gradient Nails

I wanted to try some unusual color combination for the gradient day of the challenge, so I went for rust color + dark green gradient. I like this autumn mani. Would a lighter version of the same green have been better? Probably... But I like it anyway :)


Gradient: Sponged Essence Deep Sea, Baby(dark green) and Barielle Rusty Vintage Boots (rust colored) over 2 coats of Barielle polish
Stripes: stamped stripes pattern from an OB-Nail XXL E stamping plate bought on ebay, with the same Essence green polish (yeehaa, another regular polish, which is great for stamping!) Read More......

Sunday, October 6, 2013

Girls Night out: Dirty Deeds by Darling Diva

Friday night was our Girls Night Out.  Four girls, Cosmopolitans and dancing! As a preparation I decided to take a temporary leave from the challenge and do something edgy. So I happily removed the rainbow and went for black. Rock'n'Roll!!!
I have this magnificent glitter indie polish by Darling Diva, which was PERFECT for clubbing:

It's a black based jelly polish packed with violet glitters in different forms and sizes.

I used one coat of black polish as a base (Cult Nails Fetish) and added two easy coats of the Dirty Deeds. So cool!


Read More......

Friday, October 4, 2013

31DC2013: Day 09, Rainbow Nails

The 31 Day Challenge was for September, so I'm officially late now. But it is so much fun and I'm learning a lot. So I'm still following it through. But man, have I struggled with the next topic...
I rather like simplicity and clear lines, so rainbow colors all at once are just a bit too much for my taste. But challenge is a challenge, so here I we go:

Cloudy nails  have been present in many blogs last summer, so I wanted to try it out. It's VERY easy to do,  so I'd probably recreate the sky-only-mani next summer.

Base color: white - Cult Nails Tempest
Sky: randomly sponged blue CG Towel Boy Toy and used white polish and a dotting tool to create clouds.
Rainbow: I used most of my China Glaze Neons for the rainbow, thinned with nail polish thinner. I went over the lines several times to create the desired opacity.

 Red - I didn't have a matching shade, so I mixed CG Pool Party(hot pink) and a drop of OPI Big Apple Red
Orange - CG Japanese Koi (my favorite color for pedicure - hot neon orange)
Yellow - CG Sun Worshiper
Green - CG I'm With The Lifeguard
Blue - Towel Boy Toy (light sparkling blue)
Dark Blue - Essie's Midnight Cami
There is CG Fairy Dust as a sparkle over the rainbow.


Well, I probably wouldn't wear another rainbow again, but it was good to learn how nail polish thinner can be used to add the watercolor-y consistence to a nail polish.... ;)

Read More......

Thursday, October 3, 2013

31DC2013: Day 08, Metallic Nails

I got a fantastic Barielle set of 6 nail polishes for just EUR 9,99 at an outlet store. Barielle is not common in Germany, so I was really happy to get the set, which included this pale gold goddess color.


Base color: Barielle Gold Digger
Stamping: patterns from Cheeky plate A stamped with A-England Dorian Grey (dark grey)
Studs: golden studs bought on ebay Read More......

Sunday, September 29, 2013

31DC2013: Day 07, Black & White Nails

I must admit, I went a little bit crazy on stamping since I got my Cheeky stamping plates. It's so much fun to stamp with them, that I just cannot stop :D. As you can clearly see on my black-and-white day of the 31 Day Challenge ;).
Except for my index finger, on which I used striping tape, all other patterns come from the fantastic Cheeky stamping plates I ordered online here.
Base color & stripes: Cult Nails Tempest (the "easiest" white I own, bought directly from Cult Nails with delivery to Germany) and Cult Nails Fetish: oh my, it's the grungy, almost matte black. It looked mega cool on its own, so next time I'm feeling like a rock babe, I'm wearing it with studs!
Stamping: Patterns form Cheeky Jumbo plate A and 2013 Plate "Musical Nails" , stamped with Jolfin black stamping polish. Read More......

Friday, September 27, 2013

#31DC2013: Day 06, Violet nails

I had a wonderful holiday in Riga (think Hotel Papa ;) ) and had some quality time with my cute little nephews. Now back in Hamburg,  it's high time to proceed with 31 Day Challenge. I'm totally late, but still determined to go through the themes.
The next theme is Violet Nails. I've been looking forward to try out the China Glaze Ombre set I bought on ebay. I first saw the gradient on Chalkboardnails blog and just fell in love with the beautiful colors. This is how it looks on my nails:


I know, it doesn't look as fantastic as on Chalkboardnails, but hey, that's just me, my limited nail art skills and rather ungraceful roundish nails. Who cares! I matched my mani with a violet silk scarf to work and felt like a diva :D.
But I think I'm rather a skittlette girl, so I used my Cheeky Plates to mix things up the next day:


Base color: Gradient with China Glaze Grape Expectations
Stamping: ikat pattern from the Cheeky Plate A stamped with silver Jolfin stamping polish
Skittlette: pinkie with Essence silver polish and textured P2  Sand Style polish  called "Strict" on my ring finger (I'm in love with Cheeky Plates, btw)

Since I don't have silver studs, I just used some gold ones, which I covered with silver polish as shown at Lucy's Stash Blog, and pimped up my thumbs with them.
It's amazing how you can change your mani with nail art, don't you think?

Read More......

Wednesday, September 11, 2013

#31DC2013: Day 05, Blue nails

As I wrote in my last post, I discovered that random sponging can produce beautiful marble-like results. The green base from Day 04 in this 31 Day Challenge had amazing depth and was so easy to create, that I had to sponge-marble in blue too :)
For this look I used two blue, one white-based jelly, one white and one silver nail polishes.
I used both white polishes and a drop of one blue polish to create the custom light blue shade, which I used as a base color for all my nails. And than randomly sponged the both blue and than the silver polishes:

Base color: blended drops of OPI Don't Touch My Tutu (white-based jelly), white Essence stamping polish and China Glaze Splish-Splash (bright blue with slight shimmer)
"Marble-sponging": randomly sponged China Glaze Splish-Splash, P2 So Cool! (dark royal blue with shimmer) and Essence Icy Princess (silver)
Studs: bought online at Born Pretty Store Read More......

Saturday, September 7, 2013

#31DC2013: Day 04, Green Nails

I'm doing the challenge in my own pace and it is so much fun!!! I must confess though, the idea for today's mani was entirely not mine :) I saw this amazing design and had to order the stamping plate MM16 by Messy Mansion immediately! :) I looked forward to the "green" day of the challenge, so I could recreate the design:


Since I didn't have the same shade of green as the sample mani, I decided to try sponging several green shades and even some gold over each other. I absolutely adore this newly discovered marble-like sponging technique!!! It is so easy, so I will definitely do this kind of color blending again!

I thought that black stamps with only one green accent nail looked very dark on my wide nails. The black hid the vibrant green color, so I added just one inverted stamp to my right hand.

Base Color: two coats of grass green Essie Shake Your $$ Makers, than randomly sponged some China Glaze I'm With The Lifeguard(neon green with shimmer), CG Sun-Kissed (neon marker-yellow), P2 Perfectly Good(dark green) and P2 Next Exit: Party! (gold)
Stamping: MM16 plate by Messy Mansion ordered online stamped with black Jolfin stamping polish.
  Read More......

Friday, September 6, 2013

#31DC2013: Day 03, Yellow Nails

I had to wait for the casual Friday to wear yellow nails to work ;)  My favorite sunny yellow polish is just too bright for my business meetings :-D Yellow Nails was a tough task as well. I could only think of lemons, bees and warning signs. But since I didn't have much time for my mani, I decided not to risk it and just do some cute stamps over one of my favorite combinations it did here - bright yellow China Glaze Sun Worshiper and golden liquid sunlight indie polish by Different Dimension.

Base color: one coat of Different Dimension Mr. Noisy over two coats of China Glaze Sun Worshiper
Stamping: patterns from various stamping plates (Konad m59, OB-NAIL XXL Plate E bought on Ebay from us-nails-arena) stamped with Jolfin black stamping polish. Read More......

Monday, September 2, 2013

#31DC2013: Day 02, Orange nails

Well it was tough. While thinking of something orange, only carrots , oranges and pumpkins came to my mind. Not really creative ;). Than I thought about all those abstract rounded geometrical patterns in the 60ies or 70ies. Orange and brown, orange and teal... There the idea was born, but with my beginner nail art skills the realization was impossible.
I wanted to use Essie's rich chocolate brown, which is not that pigmented in one coat, so that ruled out any stamping patterns. So I used the dotting tool  (for the first time, btw :) ). Since I was unsure I'll manage to create some circles without accidents, I used acrylic colors. That was unexpectedly easy! So this is the result:

Base color: two coats of pumpkin orange Nyx 114 and rich chocolate color Essie's Lady Godiva
Pattern: acrylic paint in brown and orange applied with dotting tool
Glitters: on thumb, index and pinkie fingers Nfu.Oh #44, which is a flakey golden glitter in orange tinted jelly base Read More......

Sunday, September 1, 2013

#31DC2013: Day 01, Red Nails

The 31 Day Challenge starts with red nails. I'm sorry for the flash - I had to take the picture inside and didn't have any indirect light sources available.
I decided to go for some Femme Fatale design. Red with black "Mouline Rouge" details ;). My most favorite red shade ever is OPI Big Apple Red. It is a saturated red, slightly darker than the poppy red (without the raspberry tint I got with my flash). The idea for the net design I got from this youtube tutorial. And the feather is from my late favorite - the stamping plate by Vivid Lacquer.


Base color: two coats of OPI Big Apple Red
Stamping: net-pattern from Konad plate M57, feather from VL006 by Vivid Lacquer, stamped with Jolfin Black stamping polish 
Read More......

My first 31 Day Challenge

I'm totally excited to join the 31 Day Challenge started by Sarah from Chalkboardnails! I will not be able to do something new every day, but I've heard you can do the challenge in your own pace.


Since Sarah wrote, that her first challenge helped to improve her nail art skills,  I decided I'm totally in!!!  I already can imagine, that it will be hard sometimes (orange or glitter nails with my business outfits?... I will have to be really creative for that... ;)) But I'm excited nevertheless! :)
Rock'n'roll!!! Read More......